Setting up shop (part 2)
Borrow from a template
At the end of the previous post, I had a domain name and an - almost - empty repo. Now I had to put something in there that does bloggy stuff. It turns out that GitHub Pages has built-in support for a static site generator called Jekyll. This means if I push some Jekyll files to the repo, a static site will be built automatically. Luckily I found a repo by Chad Baldwin who not only already has a blog set up in the same way I wanted, but also has a tutorial and template for exactly what I want to do.
The tutorial says to create a new repo and apply the template to pre-fill all the necessary files, but I already created a repo for my blog. How can I get the files there now? One way could be to delete and re-create my blog repo, but I wasn’t sure if I would be able to create a new repo with the same name as the old one (GitHub lets you recover repos deleted in the past 90 days). Instead, I decided to try transplanting the files and values necessary from the template into my repo. There was a lot of trial and error, but in the end it worked, as evident by the fact that you’re reading this.
The main things to carry over are:
Files:
- _config.yml
- index.md
Folders:
- _posts
- _layouts
- _includes
Troubleshoot issues
As I said earlier, I was transplanting files between Chad’s repo and mine to get my blog set up. Instead of copying the entire repo wholesale, I was moving single files at a time, making small changes as I’ve been trained to do during my day job, so that I don’t have to back out a massive set of changes if something goes wonky. There was a good stretch of time where my posts weren’t showing up even though I thought I set up everything correctly. Moving individual files was getting tedious, and I didn’t want to copy stuff unique to Chad’s blog accidentially. I kept making random changes to the config.yml file thinking that would fix it, but nothing worked.
Checking the pipeline
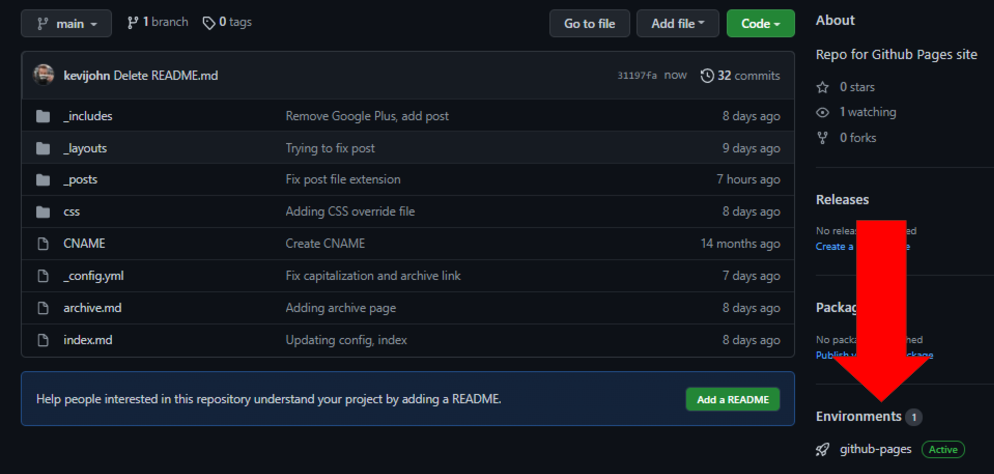
Come to find out that, on the page of my repo in GitHub, on the right-hand side, there’s a section called “Environments”. There was one item listed there: “github-pages”, and there was a status indicator showing a failure. Clicking on it, I was taken to a page that looked very similar to the Azure DevOps pipelines page I’ve seen at my day job. I inferred that what I was looking at was a pipeline GitHub is using to build a static site from my repo and deploy to an environment for github-pages. I clicked on one of the failed deployments, clicked on the Build task on the left, and found an error:
Liquid Exception: Could not locate the included file 'sharelinks.html' in any of ["/github/workspace/_includes", "/usr/local/bundle/gems/minima-2.5.1/_includes"]. Ensure it exists in one of those directories and is not a symlink as those are not allowed in safe mode. in /_layouts/post.html
This was super useful! At this point in my file transplant operation, I had not yet moved the _includes folder, which has the sharelinks.html file inside. The post.html file which I did move over has a reference to sharelinks.html, but the pipeline didn’t find sharelinks.html, so the deployment failed and that’s why I wasn’t seeing my content.
I created the _includes folder, added the sharelinks.html file, committed and push, and… got more errors (this time was for a different file called navlinks.html). But I was on the right track now; I had a way to find out when deployments were happening and what errors if any may be occurring.
At another point in my setup process, I had a link to archived posts in the page header, made a push, and then it disappeared. This was because I was mixing extensions: I told _config.yml to look for archive.md (because I copy-pasted it from one of Chad’s configs) but the actual file I pushed was archive.html. This failed silently and didn’t raise a build or deployment error, so it took longer for me to identify the cause and fix it. Lesson learned from this is to be careful when blatantly copy-pasting configuration settings and understand what it is that you’re adding (or removing).
